13. Harvester and Harvest List Editor
Metacat’s Harvester is an optional feature that can be used to automatically retrieve EML documents from one or more custom data management system (e.g., SRB or PostgreSQL) and to insert (or update) those documents to the home repository. The local sites control when they are harvested, and which documents are harvested.
For example, the Long Term Ecological Research Network (LTER) uses the Metacat Harvester to create a centralized repository of data stored on twenty-six different sites that store EML metadata, but that use different data management systems. Once the data have been harvested and placed into a centralized repository, they are replicated to the KNB network, exposing the information to an even larger scientific community.
Once the Harvester is properly configured, listed documents are retrieved and uploaded on a regularly scheduled basis. You must configure both the home Metacat and the remote sites (aka the “harvest sites”) before using this feature. Local sites must also provide the Metacat server with a list of documents that should be harvested.
13.1. Configuring Harvester
Before you can use the Harvester to retrieve documents, you must configure the feature using the settings in the metacat.properties file. Note that you must also configure each site that the Harvester will connect to and retrieve documents from (see section 7.2 for details).
The Harvester configuration information is managed in the metacat.properties file, which is located at:
<CONTEXT_DIR>/WEB_INF/metacat.properties
The Harvester properties are grouped together and begin after the comment line:
# Harvester properties
To configure Harvester, edit the metacat.properties and set appropriate values for the harvesterAdministrator and smtpServer property. You may also wish to customize the other Harvester paramaters, each discussed in the table below.
13.2. Harvester Properties and their Functions
| Property | Description and Values | |
|---|---|---|
| connectToMetacat | Determine whether Harvester should connect to Metacat to upload retrieved documents. Set to true (the default) under most circumstances. To test whether Harvester can retrieve documents from a site without actually connecting to Metacat to upload the documents, set the value to false. Values: true/false |
|
| delay | The number of hours that Harvester will wait before beginning its first harvest. For example, if Harvester is run at 1:00 p.m., and the delay is set to 12, Harvester will begin its first harvest at 1:00 a.m. Default: 0 |
|
| harvesterAdministrator | The email address of the Harvester Administrator. Harvester will send email reports to this address after every harvest. Enter multiple email addresses by separating each address with a comma or semicolon (e.g., name1@abc.edu,name2@abc.edu). Values: An email address, or multiple email addresses separated by commas or semi-colons |
|
| logPeriod | The number of days to retain Harvester log entries. Harvester log entries record information such as which documents were harvested, from which sites, and whether any errors were encountered during the harvest. Log entries older than logPeriod number of days are purged from the database at the end of each harvest. Default: 90 |
|
| maxHarvests | The maximum number of harvests that Harvester should execute before shutting down. If the value of maxHarvests is set to 0 or a negative number, Harvester will execute indefinitely. Default: 0 |
|
| period | The number of hours between harvests. Harvester will run a new harvest every specified period of hours (either indefinitely or until the maximum number of harvests have run, depending on the value of maxHarvests). Default: 24 |
|
| smtpServer | The SMTP server that Harvester uses for sending email messages to the Harvester Administrator and Site Contacts. (e.g., somehost.institution.edu). Note that the default value only works if the Harvester host machine is configured as a SMTP server. Default: localhost |
|
| Harvester Operation Properties (GetDocError, GetDocSuccess, etc.) | The Harvester Operation properties are used by Harvester to report information about performed operations for inclusion in log entries and email messages. Under most circumstances the values of these properties should not be modified. |
13.3. Configuring a Harvest Site (Instructions for Site Contact)
After Metacat’s Harvester has been configured, remote sites can register and send information about which files should be retrieved. Each remote site must have a site contact who is responsible for registering the site and creating a list of EML files to harvest (the “Harvest List”), as well as for reviewing harvest reports. The site contact can unregister the site from the Harvester at any time.
To use Harvester:
- Register with Harvester
- Compose a Harvest List (you will likely wish to use the Harvest List Editor)
- Prepare your EML Documents for Harvest
- Review the Harvester Reports
13.3.1. Register with Harvester
To register a remote site with Harvester, the Site Contact should log in to Metacat’s Harvester Registration page and enter information about the site and how it should be harvested.
Using a Web browser, log in to Metacat’s Harvester Registration page. The Harvester Registration page is inside the skins directory. For example, if the Metacat server that you wish to register with resides at the following URL:
http://somehost.somelocation.edu:8080/metacat/index.jsp
then the Harvester Registration page would be accessed at:
http://somehost.somelocation.edu:8080/metacat/style/skins/default/harvesterRegistrationLogin.jsp
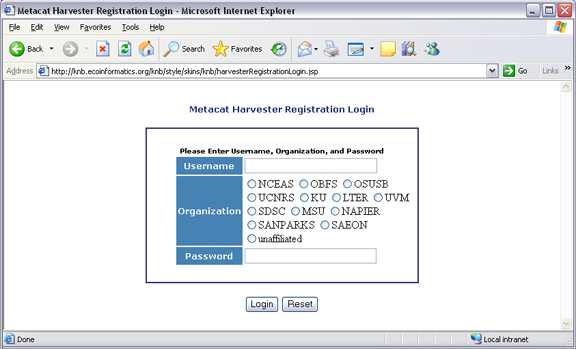
Metacat’s Harvester Registration page.
Enter your Metacat account information and click Submit to log in to your Metacat from the Harvester Registration page.
Note: In some cases, you may need to log in to an anonymous “site” account rather than your personal account so that the registered data will not appear to have been registered by a single user. For example, an information manager (jones) who is registering data created by a team of scientists (jones, smith, and barney) from the Georgia Coastal Ecosystems site might log in to a dedicated account (named with the site’s acronym, “GCE”) to indicate that the registered data is from the entire site rather than “jones”.
Enter information about your site and how often you want to schedule harvests and then click the Register button (Figure 7.2). The Harvest List URL should point to the location of the Harvest List, which is an XML file that lists the documents to harvest. If you do not yet have a Harvest List, please see the next section for more information about creating one.
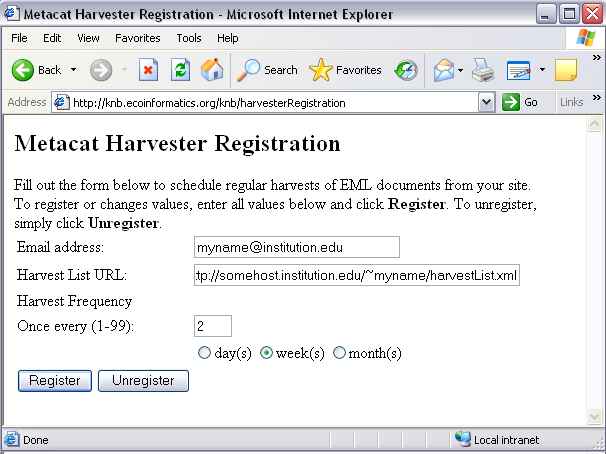
Enter information about your site and how often you want to schedule harvests.
The example settings in the previous figure instruct Harvester to harvest documents from the site once every two weeks. The Harvester will access the site’s Harvest List at URL “http://somehost.institution.edu/~myname/harvestList.xml”, and will send email reports to the Site Contact at email address “myname@institution.edu”. Note that you can enter multiple email addresses by separating each address with a comma or a semi-colon. For example, “myname@institution.edu,anothername@institution.edu”
13.3.2. Compose a Harvest List (The Harvest List Editor)
The Harvest List is an XML file that contains a list of documents to be harvested. The list is created by the site contact and stored on the site contact’s site at the location specified during the Harvester registration process (see previous section for details). The list can be generated by hand, or you can use Metacat’s Harvest List Editor to automatically generate and structure the list to conform to the required XML schema (displayed in figure at the end of this section). In this section we will look at what information is required when building a Harvest List, and how to configure and use the Harvest List Editor. Note that you must have a source distribution of Metacat in order to use the Harvest List Editor.
The Harvest List contains information that helps Metacat identify and retrieve each specified EML file. Each document in the list must be described with a docid, documentType, and documentURL (see table).
Table: Information that must be included in the Harvest List about each EML file
+————–+————————————————————————————————-+
| Item | Description |
+==============+=================================================================================================+
| docid | The docid uniquely identifies each EML document. Each docid consists of three elements: |
| | |
| | scope The document group to which the document belongs |
| | identifier A number that uniquely identifies the document within the scope. |
| | revision Anumber that indicates the current revision. |
| | |
| | For example, a valid docid could be: demoDocument.1.5, where demoDocument represents |
| | the scope, 1 the identifier, and 5 the revision number. |
+————–+————————————————————————————————-+
| documentType | The documentType identifies the type of document as EML |
| | e.g., “eml://ecoinformatics.org/eml-2.0.0”. |
+————–+————————————————————————————————-+
| documentURL | The documentURL specifies a place where Harvester can locate and retrieve the |
| | document via HTTP. The Metacat Harvester must be given read access to the contents at this URL. |
| | e.g. “http://www.lternet.edu/~dcosta/document1.xml”. |
+————–+————————————————————————————————-+
The example Harvest List below contains two <document> elements that specify the information that Harvester needs to retrieve a pair of EML documents and upload them to Metacat.
<!-- Example Harvest List -->
<?xml version="1.0" encoding="UTF-8" ?>
<hrv:harvestList xmlns:hrv="eml://ecoinformatics.org/harvestList" >
  <document>
      <docid>
          <scope>demoDocument</scope>
          <identifier>1</identifier>
          <revision>5</revision>
      </docid>
      <documentType>eml://ecoinformatics.org/eml-2.0.0</documentType>
      <documentURL>http://www.lternet.edu/~dcosta/document1.xml</documentURL>
  </document>
  <document>
      <docid>
          <scope>demoDocument</scope>
          <identifier>2</identifier>
          <revision>1</revision>
      </docid>
      <documentType>eml://ecoinformatics.org/eml-2.0.0</documentType>
      <documentURL>http://www.lternet.edu/~dcosta/document2.xml</documentURL>
  </document>
</hrv:harvestList>
Rather than formatting the list by hand, you may wish to use Metacat’s Harvest List Editor to compose and edit it. The Harvest List Editor displays a Harvest List as a table of rows and fields. Each table row corresponds to a single <document> element in the corresponding Harvest List file (i.e., one EML document). The row numbers are used only for visual reference and are not editable.
To add a new document to the Harvest List, enter values for all five editable fields (all fields except the “Row #” field). Partially filled-in rows will cause errors that will result in an invalid Harvest List.
The buttons at the bottom of the Editor can be used to Cut, Copy, and Paste rows from one location to another. Select a row and click the desired button, or paste the default values (which are specified in the Editor’s configuration file, discussed later in this section) into the currently selected row by clicking the Paste Defaults button. Note: Only one row can be selected at any given time: all cut, copy, and paste operations work on only a single row rather than on a range of rows.
To run the Harvest List Editor, from the terminal on which the Metacat source code is installed:
Open a system command window or terminal window.
Set the METACAT_HOME environment variable to the value of the Metacat installation directory. Some examples follow:
export METACAT_HOME=/home/somePath/metacat
cd to the following directory:
cd $METACAT_HOME/lib/harvester
Run the appropriate Harvester shell script, as determined by the operating system:
sh runHarvestListEditor.sh
The Harvest List Editor will open.
If you would like to customize the Harvest List Editor (e.g., specify a default list to open automatically whenever the editor is opened and/or default values), create a file called .harvestListEditor (note the leading dot character). Use a plain text editor to create the file and place the file in the Site Contact’s home directory. To determine the home directory, open a system command window or terminal window and type the following:
echo $HOME
The configuration file contains a number of optional properties that can make using the Editor more convenient. A sample configure file is displayed below, and more information about each configuration property is contained in the table.
A sample .harvestListEditor configuration file
defaultHarvestList=C:/temp/harvestList.xml
defaultScope=demo_document
defaultIdentifier=1
defaultRevision=1
defaultDocumentURL=http://www.lternet.edu/~dcosta/
defaultDocumentType=eml://ecoinformatics.org/eml-2.0.0
Harvest List Editor Configuration Properties
| Property | Description |
|---|---|
| defaultHarvestList | The location of a Harvest List file that the Editor will automatically open for editing on startup. Set this property to the path to the Harvest List file that you expect to edit most frequently. Examples:
|
| defaultScope | The value pasted into the Editor’s Scope field when the Paste Defaults button is clicked. The Scope field should contain a symbolic identifier that indicates the family of documents to which the EML document belongs. Example: xyz_dataset Default: dataset |
| defaultIdentifer | The value pasted into the Editor’s Identifier field when the Paste Defaults button is clicked. The Scope field should contain a numeric value indicating the identifier for this particular EML document within the Scope. |
| defaultRevision | The value pasted into the Editor’s Revision field when the Paste Defaults button is clicked. The Scope field should contain a numeric value indicating the revision number of this EML document within the Scope and Identifier. Example: 2 Default: 1 |
| defaultDocumentType | The document type specification pasted into the Editor’s DocumentType field when the Paste Defaults button is clicked. Default: |
| defaultDocumentURL | The URL or partial URL pasted into the Editor’s URL field when the Paste Defaults button is clicked. Typically, this value is set to the portion of the URL shared by all harvested EML documents. Example:
|
XML Schema for Harvest Lists
<?xml version="1.0" encoding="UTF-8"?>
<!-- edited with XMLSPY v5 rel. 4 U (http://www.xmlspy.com) by Matt Jones (NCEAS) -->
<xs:schema xmlns:xs="http://www.w3.org/2001/XMLSchema" xmlns:hrv="eml://ecoinformatics.org/harvestList" xmlns="eml://ecoinformatics.org/harvestList" targetNamespace="eml://ecoinformatics.org/harvestList" elementFormDefault="unqualified" attributeFormDefault="unqualified">
<xs:annotation>
  <xs:documentation>This module defines the required information for the harvester to collect documents from the local site. The local system containing this document must give the Metacat Harvester read access to this document.</xs:documentation>
</xs:annotation>
<xs:annotation>
  <xs:appinfo>
    <tooltip/>
    <summary/>
    <description/>
  </xs:appinfo>
</xs:annotation>
<xs:element name="harvestList">
  <xs:annotation>
    <xs:documentation>This represents the local document information that is used to inform the Harvester of the docid, document type, and location of the document to be harvested.</xs:documentation>
  </xs:annotation>
  <xs:complexType>
    <xs:sequence>
      <xs:element name="document" maxOccurs="unbounded">
        <xs:complexType>
          <xs:sequence>
            <xs:element name="docid">
              <xs:annotation>
                <xs:documentation>The complete document identifier to be used by metacat.  The docid is a compound element that gives a scope for the identifier, an integer local identifer that is unique within that scope, and a revision.  Each revision is assumed to specify a unique, non-changing document, so once a particular revision is harvested, there is no need for it to be harvested again.  To trigger a harvest of a document that has been updated, increment the revision number for that identifier.</xs:documentation>
              </xs:annotation>
              <xs:complexType>
                <xs:sequence>
                  <xs:element name="scope" type="xs:string">
                    <xs:annotation>
                      <xs:documentation>The system prefix of a metacat docid that defines the scope within which the identifier is unique.</xs:documentation>
                    </xs:annotation>
                  </xs:element>
                  <xs:element name="identifier" type="xs:long">
                    <xs:annotation>
                      <xs:documentation>The local (site specific) portion of the identifier (docid) that is unique within the context of the scope.</xs:documentation>
                    </xs:annotation>
                  </xs:element>
                  <xs:element name="revision" type="xs:long">
                    <xs:annotation>
                      <xs:documentation>The revision identifier for this document, indicating a unique document version.</xs:documentation>
                    </xs:annotation>
                  </xs:element>
                </xs:sequence>
              </xs:complexType>
            </xs:element>
            <xs:element name="documentType" type="xs:string">
              <xs:annotation>
                <xs:documentation>The type of document to be harvested, indicated by a namespace string, formal public identifier, mime type, or other type indicator.   </xs:documentation>
              </xs:annotation>
            </xs:element>
            <xs:element name="documentURL" type="xs:anyURI">
              <xs:annotation>
                <xs:documentation>The documentURL field contains the URL of the document to be harvested. The Metacat Harvester must be given read access to the contents at this URL.</xs:documentation>
              </xs:annotation>
            </xs:element>
          </xs:sequence>
        </xs:complexType>
      </xs:element>
    </xs:sequence>
  </xs:complexType>
</xs:element>
</xs:schema>
13.3.3. Prepare EML Documents for Harvest
To prepare a set of EML documents for harvest, ensure that the following is true for each document:
- The document contains valid EML
- The document is specified in a
<document>element in the site’s Harvest List - The file resides at the location specified by its URL in the Harvest List
13.3.4. Review Harvester Reports
Harvester sends an email report to the Site Contact after every scheduled site harvest. The report contains information about the performed operations, such as which EML documents were harvested and whether any errors were encountered. Errors are indicated by operations that display a status value of 1; a status value of 0 indicates that the operation completed successfully.
When errors are reported, the Site Contact should try to determine whether the source of the error is something that can be corrected at the site. Common causes of errors include:
- a document URL specified in the Harvest List does not match the location of the actual EML file on the disk
- the Harvest List does not contain valid XML as specified in the harvestList.xsd schema
- the URL to the Harvest List (specified during registration) does not match the actual location of the Harvest List on the disk
- an EML document that Harvester attempted to upload to Metacat does not contain valid EML
If the Site Contact is unable to determine the cause of the error and its resolution, he or she should contact the Harvester Administrator for assistance.
13.3.5. Unregister with Harvester
To discontinue harvests, the Site Contact must unregister with Harvester. To unregister:
Using a Web browser, log in to Metacat’s Harvester Registration page. The Harvester Registration page is inside the skins directory. For example, if the Metacat server that you wish to register with resides at the following URL:
http://somehost.somelocation.edu:8080/metacat/index.jsp
then the Harvester Registration page would be accessed at:
http://somehost.somelocation.edu:8080/metacat/style/skins/default/harvesterRegistrationLogin.jsp
Enter and submit your Metacat account information. On the subsequent screen, click Unregister to remove your site and discontinue harvests.
13.4. Running Harvester
The Harvester can be run as a servlet or in a command window. Under most circumstances, Harvester is best run continuously as a background servlet process. However, if you expect to use Harvester infrequently, or if wish only to test that Harvester is functioning, it may desirable to run it from a command window.
13.4.1. Running Harvester as a Servlet
To run Harvester as a servlet:
- Remove the comment symbols around the HarvesterServlet entry in the
deployed Metacat web.xml ($TOMCAT_HOME/webapps/<context>/WEB-INF).
<!--
<servlet>
  <servlet-name>HarvesterServlet</servlet-name>
  <servlet-class>edu.ucsb.nceas.metacat.harvesterClient.HarvesterServlet</servlet-class>
  <init-param>
  <param-name>debug</param-name>
  <param-value>1</param-value>
  </init-param>
  <init-param>
  <param-name>listings</param-name>
  <param-value>true</param-value>
  </init-param>
  <load-on-startup>1</load-on-startup>
</servlet>
-->
Save the edited file.
Restart Tomcat.
About thirty seconds after you restart Tomcat, the Harvester servlet will start executing. The first harvest will occur after the number of hours specified in the metacat.properties file. The servlet will continue running new harvests until the maximum number of harvests have been completed, or until Tomcat shuts down (harvest frequency and maximum number of harvests are also set in the Harvester properties).
13.4.2. Running Harvester in a Command Window
To run Harvester in a Command Window:
Open a system command window or terminal window.
Set the
METACAT_HOMEenvironment variable to the value of the Metacat webapp deployment directory.export METACAT_HOME=/home/somePath/metacat
cd to the following directory:
cd $METACAT_HOME/lib/harvester
Run the appropriate Harvester shell script, as determined by the operating system:
sh runHarvester.sh $METACAT_HOME
The Harvester application will start executing. The first harvest will occur
after the number of hours specified in the metacat.properties file. The
servlet will continue running new harvests until the maximum number of harvests
have been completed, or until you interrupt the process by hitting CTRL/C in
the command window (harvest frequency and maximum number of harvests are also
set in the Harvester properties).
13.5. Reviewing Harvest Reports
Harvester sends an email report to the Harvester Administrator after every harvest. The report contains information about the performed operations, such as which sites were harvested as well as which EML documents were harvested and whether any errors were encountered. Errors are indicated by operations that display a status value of 1; a status value of 0 indicates that the operation completed successfully.
The Harvester Administrator should review the report, paying particularly close attention to any reported errors and accompanying error messages. When errors are reported at a particular site, the Harvester Administrator should contact the Site Contact to determine the source of the error and its resolution. Common causes of errors include:
- a document URL specified in the Harvest List does not match the location of the actual EML file on the disk
- the Harvest List does not contain valid XML as specified in the harvestList.xsd schema
- the URL to the Harvest List (specified during registration) does not match the actual location of the Harvest List on the disk
- an EML document that Harvester attempted to upload to Metacat does not contain valid EML
Errors that are independent of a particular site may indicate a problem with Harvester itself, Metacat, or the database connection. Refer to the error message to determine the source of the error and its resolution.