4. Downloading and Installing Metacat
Instructions for the Linux system is included in this section.
Contents
4.1. System Requirements
In addition to meeting the recommended system requirements, the server on which you wish to install Metacat must have the following software installed and running correctly:
- PostgreSQL
- Apache Ant (if building from source)
- Apache Tomcat
- Apache HTTPD Server (recommended)
- In order to use the Metacat Registry (and for a more robust Web-serving environment in general), the Apache Web server should be installed with Tomcat and the two should be integrated. See the installing Apache for more information.
- Java 8 (Note: Java 7 is deprecated)
- Solr 8.8.2
System requirements for running Metacat:
- a server running PostgreSQL database
- at least 512MB RAM
- 200 MB disk space (Note: The amount of disk space required depends on the size of your RDBMS tablespace and the the size and number of documents stored. Metacat itself requires only about 140 MB of free space after installation).
4.2. Installing on Linux
This section contains instructions for downloading and installing Metacat on Linux systems. As Mac OS X is based on BSD Unix, these Linux instructions can be adapted to also work on Mac OS X (although the exact commands for downloading and installing packages will differ due to the different package management approaches on the Mac).
4.2.1. Quick Start Overview
For the impatient or those who have already installed Metacat and know what they are doing, here are the steps needed to install Metacat. Detailed instructions for each step are in the next section.
- Download and install prerequisites (Java 8, Apache Tomcat 7, PostgreSQL, Apache HTTPD Server)
- Create a database in PostgreSQL named ‘metacat’ and authorize access to it in
pb_hba.conffor the user ‘metacat’ - Log in to PostgreSQL and create the ‘metacat’ user
- Download Metacat from the Metacat Download Page and extract the archive
sudo mkdir /var/metacat; sudo chown -R <tomcat_user> /var/metacatsudo cp <metacat_package_dir>/metacat.war <tomcat_app_dir>sudo cp <metacat_package_dir>/metacat-index.war <tomcat_app_dir>sudo cp <metacat_package_dir>/metacatui.war <tomcat_app_dir>sudo /etc/init.d/tomcat7 restart- Configure Metacat through the Web interface
4.2.2. Downloading Metacat
Before installing Metacat, please ensure that all required software is installed and running correctly. To obtain a Metacat WAR file, which is needed for installation, download one of the following:
- the Metacat installer, which has a pre-built WAR file,
- the Metacat source distribution, which must be built in order to create a WAR file,
- the Metacat source code from SVN. You must build the source code in order to create a WAR file.
Instructions for all three options are discussed below. Note that downloading the installer (described in the next section) is the simplest way to get started.
4.2.2.1. Download the Metacat Installer (Highly Recommended)
Downloading the Metacat Installer is the simplest way to get started with the application. To download the installer:
- Browse to the Metacat Download Page. In the Metacat section, select the link to the “GZIP file” (the link should look like: metacat-bin-X.X.X.tar.gz, where X.X.X is the latest version of Metacat e.g., 2.19.0)
- Save the file locally.
- Extract the Metacat package files by typing:
tar -xvzf metacat-bin-X.X.X.tar.gz
You should see a WAR file and several sample supporting files (Table 2.1). The
extraction location will be referred to as the <metacat_package_dir> for the
remainder of this documentation.
| File | Description |
|---|---|
| metacat.war | The Metacat Web archive file (WAR) |
| metacat-site.conf | Sample Web definition file used by Apache on Ubuntu/Debian Linux systems. |
| metacat-site-ssl.conf | Sample SSL definition file used by Apache on Ubuntu/Debian Linux systems. |
| jk.conf | Sample JkMount configuration file used by Apache on Ubuntu/Debian Linux systems. |
| workers.properties | Sample workers definition file used by Apache on Ubuntu/Debian Linux systems. |
| metacat-index.war | The Metacat Index WAR for supporting SOLR query features Optional unless Metacat UI is being used. |
| metacatui.war | The Metacat UI - can be deployed as a webapp or directly in webserverMetacat UI requires metacat-index be deployed and configured. |
| authority.war | The optional LSID Server application WAR |
4.2.2.2. Download Metacat Source Code
To get the Metacat source distribution:
- Browse to the Metacat Download Page. In the Metacat section, select the link to the Metacat Source code (it will look something like this: metacat-src-X.X.X.tar.gz, where X.X.X is the latest version of Metacat, e.g., 2.19.0).
- Save the file locally.
- Extract the Metacat package files by typing (replace X.X.X with the current version number):
tar -xvzf metacat-src-X.X.X.tar.gz
- Rename the metacat-X.X.X directory to metacat.
Note that you do not need to create the WAR file directly because the Ant build-file has an “install” target that will build and deploy the WAR for you.
4.2.2.3. Check Out Metacat Source Code from GitHub (for Developers)
To clone the repository from GitHub, go to the directory where you would like the code to live and type:
git clone https://github.com/nceas/metacat metacat
The entire Metacat repository will be cloned to your local machine and the current branch is the main branch which is constantly maintained in a state ready for release. Detailed information about the code contribution please see:
https://github.com/NCEAS/metacat/blob/main/CONTRIBUTING.md
Note that you do not need to create the WAR file directly because the Ant build-file has an “install” target that will build and deploy the WAR for you.
4.2.3. Installing and Configuring Required Software
Before you can install and run Metacat, you must ensure that a recent Java SDK, PostgreSQL, Ant (if installing from source), and Tomcat are installed and running correctly. We also highly recommend that you install Apache Web server, as it provides a more robust Web-serving environment and is required by some Metacat functionality.
- Java 8
- Apache Tomcat
- Apache HTTPD Server (Highly Recommended)
- PostgreSQL Database
- Apache Ant (if building from Source)
- Solr Server
4.2.3.1. Java 8
To run Metacat, you should use Java 8. Make sure that the JAVA_HOME
environment variable is properly set and that both java and javac
are on your PATH.
To install Java if you are running Ubuntu/Debian, you can install using apt-get:
sudo apt-get install openjdk-8-jdk
If you are not using Ubuntu/Debian, you can get Java from the Oracle website and install using the RPM installer.
4.2.3.2. Apache Tomcat
We recommend that you install Tomcat 6 or 7 or 8 into the directory of your choice. The newer versions are preferred. Included with the Metacat download is a Tomcat-friendly start-up script that should be installed as well.
Note: we will refer to the Tomcat installation directory as <tomcat_home> for
the remainder of the documentation.
If you are running Ubuntu/Debian, get Tomcat by typing:
sudo apt-get install tomcat7
Otherwise, get Tomcat from the Apache Tomcat page.
After installing Tomcat, you can switch back to the Sun JDK by typing:
sudo update-alternatives --config java
and selecting the correct Java installation.
If using Tomcat with Apache/mod_jk, enable the AJP connector on port 8009 by uncommenting that section in:
<tomcat_home>/conf/server.xml
For DataONE deployments edit:
/etc/tomcat7/catalina.properties
to include:
org.apache.tomcat.util.buf.UDecoder.ALLOW_ENCODED_SLASH=true
org.apache.catalina.connector.CoyoteAdapter.ALLOW_BACKSLASH=true
Note: If you’re running Tomcat using systemd, systemd sandboxes Tomcat limiting the directories it can write to and prevents Metacat from operating correctly. Ensure the following lines exist in the service file for Tomcat (paths may vary depending on your configuration):
ReadWritePaths=/var/metacat
ReadWritePaths=/etc/default/solr.in.sh
4.2.3.3. Apache HTTPD Server (Highly Recommended)
Although you have the option of running Metacat with only the Tomcat server, we highly recommend that you run it behind the Apache Web server for several reasons; running Tomcat with the Apache server provides a more robust Web serving environment. The Apache Web server is required if you wish to install and run the Metacat Registry or to use the Metacat Replication feature.
This section contains instructions for installing and configuring the Apache Web server for Metacat on an Ubuntu/Debian system. Instructions for configuring Apache running on other Linux systems are included in the sidebar.
- Install the Apache and Mod JK packages (Mod JK is the module Apache uses to talk to Tomcat applications) by typing:
sudo apt-get install apache2 libapache2-mod-jk
If you are installing the Apache server on an Ubuntu/Debian system, and you installed Apache using apt-get as described above, the Metacat code will have helper files that can be dropped into directories to configure Apache. Depending on whether you are installing from binary distribution or source, these helper files will be in one of two locations:
- the directory in which you extracted the distribution (for binary distribution)
<metacat_code_dir>/src/scripts(for both the source distribution and source code checked out from SVN). We will refer to the directory with the helper scripts as<metacat_helper_dir>and the directory where Apache is installed (e.g.,/etc/apache2/) as<apache_install_dir>.
- Set up Mod JK apache configuration by typing:
sudo cp <metacat_helper_dir>/debian/jk.conf <apache_install_dir>/mods-available
sudo cp <metacat_helper_dir>/debian/workers.properties <apache_install_dir>
- Disable and re-enable the Apache Mod JK module to pick up the new changes:
sudo a2dismod jk
sudo a2enmod jk
- Apache needs to know about the Metacat site. The helper file named “metacat-site.conf” has rules that tell Apache which traffic to route to Metacat. Set up Metacat site by dropping the metacat-site file into the sites-available directory and running a2ensite to enable the site:
sudo cp <metacat_helper_dir>/metacat-site.conf <apache_install_dir>/sites-available
sudo a2ensite metacat-site.conf
- Disable the default Apache site configuration:
sudo a2dissite 000-default
- Restart Apache to bring in changes by typing:
sudo /etc/init.d/apache2 restart
4.2.3.4. PostgreSQL Database
Currently Metacat only supports PostgreSQL. You can choose the release versions of PostgreSQL 8, 9, 10 or 11. The newer versions are preferred. To install and configure PostgreSQL:
- If you are running Ubuntu/Debian, get PostgreSQL by typing:
sudo apt-get install postgresqlOn other systems, install the rpms for postgres.
- Start the database by running:
sudo /etc/init.d/postgresql-8.4 start
- Change to postgres user:
sudo su - postgres
- Set up an empty Metacat database instance by editing the postgreSQL configuration file:
gedit /etc/postgresql/8.4/main/pg_hba.confAdd the following line to the configuration file:
host metacat metacat 127.0.0.1 255.255.255.255 passwordSave the file and then create the Metacat instance:
createdb metacat
- Log in to postgreSQL by typing:
psql metacat
- At the psql prompt, create the Metacat user by typing:
CREATE USER metacat WITH PASSWORD 'your_password';where ‘your_password’ is whatever password you would like for the Metacat user.
- Exit PostgreSQL by typing
\q
- Restart the PostgreSQL database to bring in changes:
/etc/init.d/postgresql-8.4 restart
- Log out of the postgres user account by typing:
logout
- Test the installation and Metacat account by typing:
psql -U metacat -W -h localhost metacat
- Log out of postgreSQL:
\q
The Metacat servlet automatically creates the required database schema. For more information about configuring the database, please see Database Configuration.
4.2.3.5. Solr Server
From version 2.13.0, Metacat uses the external Solr HTTP server as the search engine. Unfortunately the Solr Debian packages that come with the Ubuntu operating system are obsoleted and you have to install the binary packages by yourself. This section provides guidance on how to setup Solr to run in production on *nix platforms, such as Ubuntu.
Metacat only supports Solr 8.*, NOT 9.*. You may download the binary releases from:
https://solr.apache.org/downloads.html#solr-8112
- Go to the directory which contains the Solr release file and extract the installation script file by typing (assuming the downloaded file is solr-8.11.2.tgz):
tar xzf solr-8.11.2.tgz solr-8.11.2/bin/install_solr_service.sh --strip-components=2
- Install Solr as the root user:
sudo bash ./install_solr_service.sh solr-8.11.2.tgz
If you upgrade Solr from an old 8.* version to 8.11.2, you may run this command instead:
sudo bash ./install_solr_service.sh solr-8.11.2.tgz -f
- Ensure the Solr defaults file is group writable:
sudo chmod g+w /etc/default/solr.in.sh
- Check if the Solr service is running:
sudo service solr status
- Make sure the firewall is running and the default port 8983 isn’t exposed externally (assume you are using ufw):
sudo ufw status
- Add New Allowed Solr Paths
Add a new line for the SOLR_OPTS variable in the environment specific include file (e.g. /etc/default/solr.in.sh) such as:
SOLR_OPTS="$SOLR_OPTS -Dsolr.allowPaths=*"
- Increase Memory
Note: If you are upgrading the Solr server and you might already run this command during the previous installation, you may skip this step.
By default, Solr sets the maximum Java heap size to 512M (-Xmx512m). Values between 10 and 20 gigabytes are not uncommon for production servers. When you need to change the memory settings for your Solr server, use the SOLR_JAVA_MEM variable in the environment specific include file (e.g. /etc/default/solr.in.sh) such as:
SOLR_JAVA_MEM="-Xms2g -Xmx2g"
- Tomcat and Solr User Management
Note: If you are upgrading the Solr server and you have already run this command during the previous installation, you may skip this step.
The interaction of the Tomcat and Solr services can cause the file permission issues.
Add the tomcat8 user to the solr group and the solr user to tomcat8 group to fix the problem:
sudo usermod -a -G solr tomcat8
sudo usermod -a -G tomcat8 solr
- Restart the Solr server to make the new group setting effective (Important)
sudo service solr stop
sudo service solr start
- Check that the
tomcat8user andsolruser are members of the appropriate groups with:
sudo groups tomcat8
sudo groups solr
Note: If you’re running Tomcat using systemd, systemd sandboxes Tomcat limiting the directories it can write to and prevents Metacat from operating correctly. Ensure the following lines exist in the service file for Tomcat (paths may vary depending on your configuration):
ReadWritePaths=/var/metacat
ReadWritePaths=/etc/default/solr.in.sh
4.2.3.6. Apache Ant (if building from Source)
If you are building Metacat from a source distribution or from source code checked out from SVN, Ant is required. (Users installing Metacat from the binary distribution do not require it.) Ant is a Java-based build application similar to Make on UNIX systems. It takes build instructions from a file named “build.xml”, which is found in the root installation directory. Metacat source code comes with a default “build.xml” file that may require some modification upon installation.
If you are running Ubuntu/Debian, get Ant by typing:
sudo apt-get install ant
Otherwise, get Ant from the Apache Ant homepage.
Ant should be installed on your system and the “ant” executable shell script should be available in the user’s path. The latest Metacat release was tested with Ant 1.8.2.
4.2.4. Installing Metacat
Instructions for a new install, an upgrade, and a source install are included below.
4.2.4.1. New Install
Before installing Metacat, please ensure that all required applications are installed, configured to run with Metacat, and running correctly. If you are upgrading an existing Metacat servlet, please skip to Upgrade. For information about installing from source, skip to Source Install and Upgrade.
To install a new Metacat servlet:
- Create the Metacat directory. Metacat uses a base directory to store data, metadata, temporary files, and configuration backups. This directory should be outside of the Tomcat application directory so that it will not get wiped out during an upgrade. Typically, the directory is ‘/var/metacat’, as shown in the instructions. If you choose a different location, remember it. You will be asked to configure Metacat to point to the base directory at startup. Create the Metacat directory by typing:
sudo mkdir /var/metacat
- Change the ownership of the directory to the user that will start Tomcat by typing (note: If you are starting Tomcat as the root user, you do not need to run the chown command):
sudo chown -R <tomcat_user> /var/metacat
- Install the Metacat, Metacat-index and MetacatUI WAR in the Tomcat web-application directory. For instructions on downloading the Metacat WAR, please see Downloading Metacat. Typically, Tomcat will look for its application files (WAR files) in the <tomcat_home>/webapps directory (e.g., /usr/share/tomcat7/webapps). Your instance of Tomcat may be configured to look in a different directory. We will refer to the Tomcat application directory as <tomcat_app_dir>. NOTE: The name of the WAR file (e.g., metacat.war) provides the application context, which appears in the URL of the Metacat (e.g., http://yourserver.com/metacat/). To change the context, simply change the name of the WAR file to the desired name before copying it. To install the Metacat WAR:
sudo cp <metacat_package_dir>/metacat.war <tomcat_app_dir>
sudo cp <metacat_package_dir>/metacat-index.war <tomcat_app_dir>
sudo cp <metacat_package_dir>/metacatui.war <tomcat_app_dir>
- Restart Tomcat. Log in as the user that runs your Tomcat server (often “tomcat”) and type:
sudo /etc/init.d/tomcat7 restart
Congratulations! You have now installed Metacat. If everything is installed correctly, you should see the Authentication Configuration screen (Figure 2.1) when you type http://yourserver.com/yourcontext/ (e.g., http://knb.ecoinformatics.org/knb) into a browser. For more information about configuring Metacat, please see the Configuration Section.
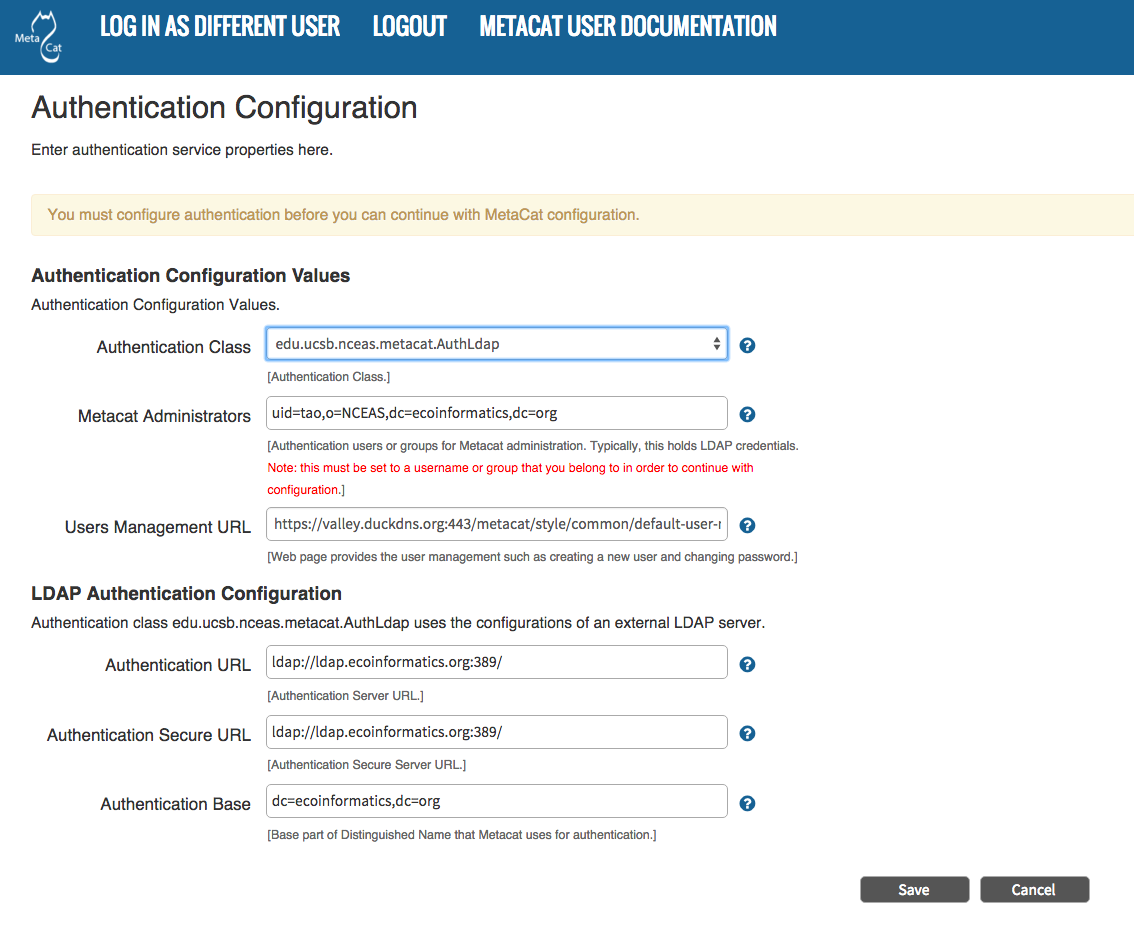
The Authentication Configuration screen appears the first time you open a new installation of Metacat.
4.2.4.2. Upgrade Metacat
To upgrade an existing binary Metacat installation follow the steps in this section. The steps for upgrading Metacat from source are the same as the instructions for installing from source:
- Download and extract the new version of Metacat. For more information about downloading and extracting Metacat, please see Downloading Metacat.
- Stop running Metacat. To stop Metacat, log in as the user that runs your Tomcat server (often “tomcat”) and type:
/etc/init.d/tomcat7 stop
- Back up the existing Metacat installation. Although not required, we highly recommend that you back up your existing Metacat to a backup directory (<backup_dir>) before installing a new one. You can do so by typing:
cp <web_app_dir>/metacat <backup_dir>/metacat.<yyyymmdd>
cp <web_app_dir>/metacat.war <backup_dir>/metacat.war.<yyyymmdd>
Warning: Do not backup the files to the
<web_app_dir>directory. Tomcat will try to run the backup copy as a service.
- Copy the new Metacat WAR file in to the Tomcat applications directory:
sudo cp <metacat_package_dir>/metacat.war <tomcat_app_dir>Note: Typically, Tomcat will look for its application files (WAR files) in the
<tomcat_home>/webappsdirectory. Your instance of Tomcat may be configured to look in a different directory.
- If you have been (or would like to start) running an LSID server, copy the new authority.war file to the Tomcat applications directory. For more information about the LSID server, please see Optional Installation Options.
sudo cp <metacat_package_dir>/authority.war <tomcat_app_dir>
- Restart Tomcat (and Apache if you have Tomcat integrated with it). Log in as the user that runs your Tomcat server (often “tomcat”), and type:
/etc/init.d/tomcat7 restart
7. Run your new Metacat servlet. Go to a Web browser and visit your installed Metacat application, using a URL of the form:
http://yourserver.yourdomain.com/yourcontext/
You should substitute your context name for “yourcontext” in the URL above (your context will be “metacat” unless you change the name of the metacat.war file to something else). If everything is working correctly, you should be presented with Metacat’s Authorization Configuration screen. Note that if you do not have Tomcat integrated with Apache you will probably have to type http://yourserver.yourdomain.com:8080/yourcontext/
4.2.4.3. Source Install and Upgrade
Whether you are building Metacat from the source distribution or source code checked out from SVN, you will need Apache Ant to do the build (see Installing and Configuring Required Software for more information about Ant).
To install Metacat from source:
- Edit the build.properties file found in the directory in which you
downloaded Metacat. Note: Throughout the instructions, we will refer to this
directory as
<metacat_src_dir>.
- Set the build.tomcat.dir property to your Tomcat installation directory. Metacat will use some of the native Tomcat libraries during the build. For instance: build.tomcat.dir=/usr/local/tomcat
- Set the app.deploy.dir property to your application deployment directory. For instance: app.deploy.dir=/usr/local/tomcat/webapps
- In the
<metacat_src_dir>, run:
sudo ant clean installYou will see the individual modules get built. You should see a “BUILD SUCCESSFUL” message at the end.
You should see a new file named metacat.war in your application deployment directory.
To run your new Metacat servlet, open a Web browser and type:
http://yourserver.yourdomain.com/yourcontext/
(e.g.  http://knb.ecoinformatics.org/metacat/)
Your context will be “metacat” unless you changed the name of the metacat.war file to something else. The servlet may require a few seconds to start up, but once it is running, you will be presented with the Authorization Configuration screen.
4.2.5. Optional Installation Options (LSID Server)
Note
The support for LSID identifiers is deprecated, and is being replaced with support for DOI identifiers in a future release. We are maintaining support for LSIDs on one particular site, but this support will be removed in a future version of Metacat.
Metacat’s optional LSID server allows Metacat to use a standardized syntax for identifying data sets, in addition to Metacat’s internal, custom scheme for identifiers. LSID’s were designed to identify complex biological entities with short identifiers (much like DOIs in publishing) that are both computer and human readable. LSID identifiers are URIs and are therefore usable in many Internet applications, but they also cleanly separate the identity of a data set (i.e., its permenant identifier) from its current location (e.g., the list of URLs from which it might be retrieved). LSIDs accomplish this by using a level of indirection; the identifier represents simply a name without location, but an associated resolver service can be used to locate the current location of the data and medata for the data set. This is accomplished by establishing a well-known location for the resolution service for each authority using an infrequently used feature of the domain name system called SRV records. At its most basic, resolution of an identifier is performed when a client looks up the SRV record for an LSID by querying DNS, which returns the current host and port of the authority web service, which is in turn used to locate the data and metadata.
Using LSIDs to identify data records is being debated among members of the Taxonomic Databases Working Group (TDWG). There are several alternate technologies that are under consideration (e.g., DOI, plain http URIs), and so at this time the support for LSIDs in Metacat has been created on an experimental basis only. If the LSID approach is ratified by the broader community, we will expand support for LSIDs in Metacat, but until then it is an optional and experimental feature.
The format of an LSID is:
urn:lsid:<Authority>:<Namespace>:<ObjectID>[:<Version>]
e.g., urn:lsid:ecoinformatics.org:tao:12039:1
When you enable the Metacat LSID support, you can use LSID clients (such as LSID Launchpad) and LSID notation to query Metacat for data and metadata. LSID notation can be used directly in Metacat HTTP queries as well. For example, a data package with an ID tao.12039.1 that is stored in a Metacat available at: http://example.com:9999 can be accessed by the following HTTP Metacat queries:
http://example.com:9999/authority/data?lsid=urn:lsid:ecoinformatics.org:tao:12039:1
(To return the data)

http://example.com:9999/authority/metadata?lsid=urn:lsid:ecoinformatics.org:tao:12039:1
(To return the metadata)
Notice that in the HTTP query strings, the periods in the data package ID have been replaced with colons. The authority (ecoinformatics.org) must be properly configured by the Metacat administrator. Note: In order to configure the authority, you must have access to the DNS server for the Metacat domain. Further instructions are provided below.
4.2.5.1. Install and configure the LSID Server shipped with Metacat
To install the LSID server using the binary installation:
- Copy the authority.war file to Tomcat:
sudo cp <metacat_package_directory>/authority.war /usr/share/tomcat7/webapps
Set up the LSID server by dropping the authority file into Apache’s sites-available directory and running a2ensite to enable the site:
sudo cp <metacat_helper_dir>/authority /etc/apache2/sites-available
sudo a2ensite authority
Restart Tomcat. Log in as the user that runs your Tomcat server (often “tomcat”) and type:
/etc/init.d/tomcat5.5 restart
Restart Apache to bring in changes by typing:
sudo /etc/init.d/apache2 restart
- See notes beneath LSID server source installation for instructions for modifying the SRV record(s)
4.2.5.2. To install the LSID server from a source
- In the build.properties file found in the directory into which you extracted the Metacat source code, set the authority and config.lsidauthority properties. For example:
authority.context=authority
config.lsidauthority=ecoinformatics.org
- In the <metacat-src-dirctory> create the authority.war by running:
sudo ant war-lsid
- Copy the LSID WAR file into the Tomcat application directory.
sudo cp <metacat_package_dir>/dist/authority.war <tomcat_app_dir>
- Restart Tomcat. Log in as the user that runs your Tomcat server (often “tomcat”) and type:
/etc/init.d/tomcat7 restart
- If you are running Tomcat behind the Apache server (the recommended configuration), set up and enable the authority service site configurations by typing:
sudo cp <metacat_helper_dir>/authority <apache_install_dir>/sites-available
sudo a2ensite authority
Where <metacat_helper_dir> can be found in <metacat_code_dir>/src/scripts
- Restart Apache to bring in changes by typing:
sudo /etc/init.d/apache2 restartOnce the authority.war is installed, you must also modify the SRV record(s) on the DNS server for the domain hosting the Metacat. The record should be added to the master zone file for the metacat’s DNS server:
_lsid._tcp IN SRV 1 0 8080 <metacat.edu>.Where <metacat.edu> is the name of the machine that will serve as the physical location of the AuthorityService.
For example, the value of <metacat.edu> for the below example URL would be example.com:
http://example.com:9999/authority/data?lsid=urn:lsid:ecoinformatics.org:tao:12039:1For more information, please see http://www.ibm.com/developerworks/opensource/library/os-lsid/
4.2.6. Troubleshooting
We keep and update a list of common problems and their solutions on the KNB website. See http://knb.ecoinformatics.org/software/metacat/troubleshooting.html for more information.